Showing posts with label CMS. Show all posts

Saturday, February 8, 2014

[Joomla] Joomla Administrator Component Structure

An overview


What is a component in Joomla ?
According the definition in official site, a component is a kind of Joomla! Extension which are the main functional units of Joomla!; An easy analogy would be that Joomla! is the operating system and the components are desktop applications. They are usually displayed in the center of the main content area of a template (depending on the template).

Most components have two main parts: an administrator part and a site part. The site part is what is used to render pages when being called during normal site operation. The administrator part provides an interface to configure and manage different aspects of the component and is accessible through the Joomla! administrator application.

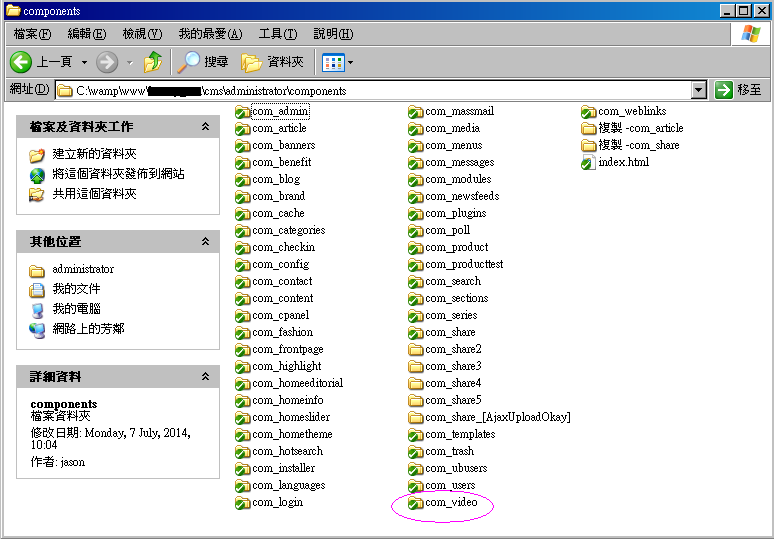
One of a specific component was shown in this picture:


Where to edit the components?
Path:
Your_joomla_root\cms\administrator

This is a list of the components for the administrator control panel in the image shown below,


and this article would use com_video as an example:


If the name of your component is named “video”, your directory name should be named com_video.
The files name In orange must same at the component name:
Files with yellow background are added for this project.
And the file with cancel line can be ignoring.

And let have an overviews of the MVC models in joomla:
1)      Model    (administrator part)
2)      Views    (site part)
3)      Controller (administrator part)

Models:

Models in joomla is in folder named models and tables.


Folder tree of these 2 folders:
1)      Models
1.1         Index.html (<- can ignore)
1.2         Video.php (<- store sql)
2)      Tables
2.1  Index.html (<- can ignore)
2.2  Video.php (<- store table 1 structure )
2.3  Videourl.php (<- store table 2 structure )


Video.php (1.2) in models is placing the sql.  For an example, the sql query was placed in the function insert_video_brand() and update_video_brand();


Video.php (2.2) in tables is placing the database table field. Detailed information please referenced from the image below:
Video.php is for a table named Tbl_video.


Videourl.php is for a table named Tbl_video_url.


======================

Views

Views of component you created in joomla is in folder named views. 
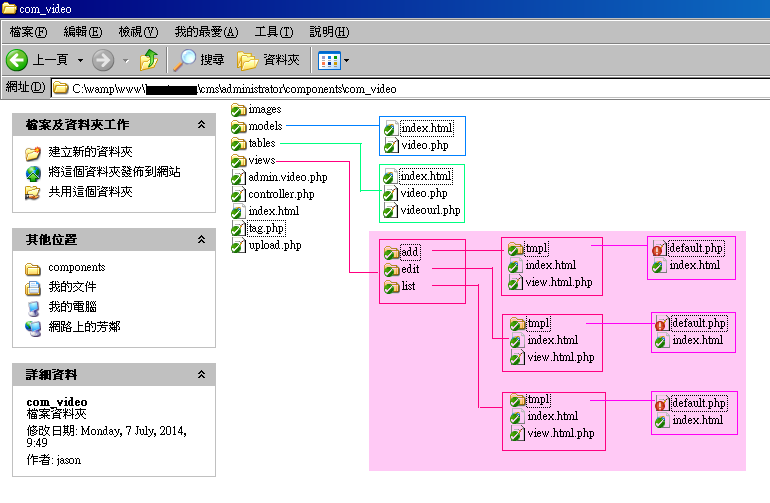


This is a list files tree of views
1)      Add
1.1         Tmpl
1.1.1   Default.php   (<- layout of add function)
1.1.2   Index.html    (<- can ignore)
1.2         Index.html       (<- can ignore)
1.3         View.html.php    (<- additional function for the add page)
2)      Edit
2.1    Tmp
2.1.1        Default.php  (<- layout of edit function)
2.1.2        Index.html   (<- can ignore)
2.2    Index.html       (<- can ignore)
2.3    View.html.php    (<- additional function for the edit page)
3)      list
3.1    Tmpl
2.3.1        Default.php  (<- layout of edit function)
3.1.1        Index.html   (<- can ignore)
3.2    Index.html       (<- can ignore)
3.3    View.html.php    (<- additional function for the list page)


1)     Add page
The file “add /tmpl /Default.php” (1.1.1) is a page contains the html code to control the list page layout. There is the layout:


File/view.html.php contains the additional function for add page,
For example, the display() method to control the display order and apply the filter to the list page display list.

2)     Edit page
The file “edit/tmpl /Default.php” (2.1.1) is a page contains the html code to control the list page layout. There is the layout:


File/view.html.php contains the additional function for list page,
For example, the display() method interactive with database.


3)     List page
The file “list/tmpl /Default.php” (3.1.1) is a page contains the html code to control the list page layout. There is the layout:


File/view.html.php contains the additional function for list page,
For example, the display() method to control the display order and apply the filter to the list page display list.

Controllers

The files with orange background is the controllers part.


File tree:
1)      Admin.video.php (-> call controller.php using require_once();)
2)      Controller.php  (-> load views and set define actions)

Content in admin.video.php is for get admin.video.php.


Content in is for loading views and set define actions:


Tuesday, July 9, 2013

[Joomla!][Tutorial] Way to Add a shortcut icon to Joomla Admin control panel (with image)


This short article is for showing the how to add the icon to joomla 's  Admin control panel index  page and link to your component.
 
Firstly, let have a look about where the icon would be added:


And there is the way to add the icon:

1)      Visit this path and edit mod_quickicon.php.

Your_joomla_root\administrator\modules\mod_quickicon\mod_quickicon.php

 (change text in red to your joomla root)

2)      Look for the div tab with id name “cpanel” (<div id="cpanel"> … </div>) then copy one of these code.


Change text in red to your component folder name and text in blue to your icon button image path.


$link = 'index.php?option=com_benefit’;
quickiconButton( $link, 'icon-48-benefit-add.png', JText::_( 'New Post' ) );


And then the icon will be added:


Reference:

Monday, May 27, 2013

[Wordpress][Solved] Fix the Internal Server Error in WordPress

Firstly, I think I should talkabout my case first:

I installed wordpress in a folder named "ffftest", and the folder is placed at root.
One day, I make the domain point to the folder "ffftest",
That means I input "http://www.ffftest.com/ffftest" before to access wordpress index page,
And Now I am able to use "http://www.ffftest.com/" to access wordpress index page directly.

It's sure that I need config the path in database but I missed that :
Change this file, ".htaccess" which is placed in the root of your wordpress.

From this: (the text in red is your old path)
# BEGIN WordPress
RewriteEngine On
RewriteBase /ffftest/
RewriteRule ^index\.php$ - [L]
RewriteCond %{REQUEST_FILENAME} !-f
RewriteCond %{REQUEST_FILENAME} !-d
RewriteRule . /ffftest/index.php [L]

# END WordPress
To this: (the text in green is your new path)
# BEGIN WordPress

RewriteEngine On
RewriteBase /ffftest/
RewriteRule ^index\.php$ - [L]
RewriteCond %{REQUEST_FILENAME} !-f
RewriteCond %{REQUEST_FILENAME} !-d
RewriteRule . /index.php [L]

# END WordPress
my wordpress's root directory is "http://www.ffftest.com/ffftest" before
"/ffftest/index.php" means  http://www.ffftest.com/ffftest"
my wordpress's root directory "http://www.ffftest.com/" now,
So I use "/index.php" now,
"/index.php" means  http://www.ffftest.com/"

You can see is there sth wrong in wordpress's .htaccess file

Monday, March 4, 2013

[Wordpress][Tutorial] Installing wordpress mu must use plugins with image and example

Mu-plugins, are plugins located at wp-content/mu-plugin folder, and it’s also known as “Must Use plugin”. At usual, it was used for the wordpress multisite version.
About the reason why using mu-plugins is cos it can be automatically enabled on all sites in the installation and the Must-use plugins do not show in the default list of plugins on the Plugins page of wp-admin.

The steps to install Must-use plugin is really easy, you just need to move the source code to the plugin is already okay.

Now I would use my localhost be an example:

Step 1)
Create a folder named “mu-plugins” in your “wp-content” directory:
The wp-content Path :Your_wordpress_root\wp-content For my case my path wp-content is
C:\wamp\www\test\wp-content

Open a folder there.


Step 2)
Create a blank file name your_plugin._name.php. For an example, I use logo.php


Step 3)
Copy the example plugin code to test your plugin file you have just added :

<?php/** * @package fnq *//*Plugin Name: fnqPlugin URI: http://akismet.com/?return=trueDescription: Custom Wordpress plugin, F&QVersion: 0.0.1Author: TestingAuthor URI: fnqLicense: GPLv2 or later*/?><?php
add_action( 'init', 'create_icon_post' );add_filter('manage_edit-gallery_columns', 'add_new_gallery_columns');  function create_icon_post() {    register_post_type( 'logo',//url        array(            'labels' => array(                'name' => 'Logo',                'singular_name' => 'Company Logo',                'add_new' => 'Add New',                'add_new_item' => 'Add New Comapny Logo', //title                'edit' => 'Edit',                'edit_item' => 'Edit Company Logo',                'new_item' => 'New Company Logo',                'view' => 'View',                'view_item' => 'View Company Logo',                'search_items' => 'Search Company Logo',                'not_found' => 'No Company Logo found',                'not_found_in_trash' => 'No Company Logo found in Trash',                'parent' => 'Parent Company Logo'            ),             'public' => true,            'menu_position' => 15,            'supports' => array( 'title', 'editor', 'comments', 'thumbnail', 'custom-fields' ),            'taxonomies' => array( '' ),            'menu_icon' => plugins_url( 'icon_logo.png', __FILE__ ),            'has_archive' => true        )    );}?>
This is the icon to be copy, named "icon_logo.png"
 

Step 4)
Move to your admin panel and refresh the page, you will find the plugin will automatic applied.


And you will find it’s will not appear in the installed plugin list.


Making compare:

If you move the plugin file to plugins folder
The plugins folder path :Your_wordpress_root\wp-content For my case my plugins folder path is
C:\wamp\www\test\wp-content


You will find the plugin would be appear in to installed list and need to be activated by the wordpress users, can’t be enabled automatically.


Remarks:
1.          You cannot be disabled except by removing the plugin file from the must-use directory, which is found in wp-content/mu-plugins by default, if you want disable the Must-use plugin, remove it from the folder or delete it.
2.          The must-use plugin cannot run in sub-folder, to know the detail and the solution, please read this article: Autoload Must Use Plugins In Sub Folders In WordPress

Reference

[Wordpress] Wordpress theme tutorial for beginners (3) - Dynamic Blog Content

This article is continued with [Wordpress][Tutorial with image] Wordpress theme tutorial for beginners (2), After created the basic interface , let make some dynamic blog content!

After adding the code , your blog will be able to display the blog categories, Archives, and also the blog content let add the code to sidebar.php first:

Add code into sidebar.php


    <div id="sidebar">
    <!-- Side Bar Categories -->
    <h2 ><?php _e('Categories'); ?></h2>
    <ul >
    <?php wp_list_cats('sort_column=name&optioncount=1&hierarchical=0'); ?>
    </ul>
    <!-- Side Bar Archives -->   
    <h2 ><?php _e('Archives'); ?></h2>
    <ul >
    <?php wp_get_archives('type=monthly'); ?>
    </ul>   
    </div>

Remarks :
Function wp_list_cats() is for call the Categories
wp_list_cats(‘arguments’);wp_list_cats('sort_column=name&optioncount=1&hierarchical=0');
Reference:http://codex.wordpress.org/Function_Reference/wp_list_cats Function wp_get_archives () is for call the Blog Archiveswp_get_archives( $args );wp_get_archives('type=monthly'); Reference:http://codex.wordpress.org/Function_Reference/wp_get_archives

Add code into index.php

asdsad
 <?php get_header(); ?>
    <div id="content">    <?php if (have_posts()) : while (have_posts()) : the_post(); ?>    <h1><?php the_title(); ?></h1>    <h4>Posted on <?php the_time('F jS, Y') ?></h4>    <p><?php the_content(__('(more...)')); ?></p>    <hr> <?php endwhile; else: ?>    <p><?php _e('Sorry, no posts matched your criteria.'); ?></p><?php endif; ?>    </div><?php get_sidebar(); ?><?php get_footer(); ?>


The structure is about checking is there any posts first. 
If there is any post, print the title, post time and content.
Otherwise, display the text “Sorry, no posts matched your criteria”

Result :


Reference:

Sunday, March 3, 2013

[Wordpress] Wordpress theme tutorial for beginners (2) - Adding Interface

After created the most base theme,
(If you missed that, you can visit this link to view )

Let move to making the interface:
=============================================
There are around 4 parts within a wordpress theme, they are header, content, sidebar and footer part.

At usual, header part is for showing the “HTML head Elements”, your site logo and site description, and also the menu bar,
Content is dynamic generated by the wordpress,
Side Bar is for your blog information (for e.g. blog archives, categories and so on. )
Footer is placing your copyright information.

And these is the structure in image:


An overview:
1.          Header (header.php)
2.          Content (dynamic display)
3.          Side Bar (sidebar.php)
4.          Footer (footer.php)

* * *

Step 1)
Now let create some blank pages named “header.php”, “sidebar.php”, ”footer.php” first.


For me I would like to make all the code into a file (index.php) and then divide the code to others file (header.php, sidebar.php, footer.php):

index.php
<html>
<head>
    <title>Leobo theme</title>
    <link rel="stylesheet" href="<?php bloginfo('stylesheet_url'); ?>">
</head>
<body>
<div id="main_wrapper">
    <div id="header"></div>
    <div id="content">Theme tutorial testing.</div>
    <div id="sidebar"></div>
    <div id="footer"></div>
</div>  
</body>
</html>

Let go to your wordpress blog to view the amendment:


And now let add some more content into the theme:

index.php

<html>
<head>
    <title>Leobo theme</title>
    <link rel="stylesheet" href="<?php bloginfo('stylesheet_url'); ?>">
</head>
<body>
<div id="main_wrapper">
    <div id="header">This is the header.</div>
    <div id="content">Theme tutorial testing.</div>
    <div id="sidebar">Side Bar</div>
    <div id="footer">Text is available under the Creative Commons Attribution-ShareAlike License; <br />
additional terms may apply. By using this site, you agree to the Terms of Use and Privacy Policy. <br />
CopyRight &copy; wordpress and terrapin sky</div>
</div>  
</body>
</html>
style.css
/*
Theme Name: Leobo's Theme
Theme URI: http://www.terrapinssky.blogspot.com/theme/leobo
Author: Xenia Law
Author URI: http://www.terrapinssky.blogspot.com/
Description: This is the most base theme.
Version: 1.0.1
License: GNU General Public License v2 or later
License URI: http://www.gnu.org/licenses/gpl-2.0.html
Tags: blank, base
Text Domain: leobo
*/
div {display:block;}
html {}
body {background:#000;}
#main_wrapper {float:left; background:#fff; width:960px; }
#header { float:left; width:960px; height:100px; background:#000; color:#fff; padding:20px 10px;}
#content { float:left; width:580px; color:#000; padding:20px 10px;}
#sidebar { float:left; width:340px; color:#000; padding:20px 10px;}
#footer { float:left; width:960px; height:100px; background:#000; color:#fff; font-size:11px; padding:20px 10px;}
After added the code to index.php and style.css,
Go to your blog and refresh again,
and found the interface changed :


And now let divide the code from index.php to others page:

header.php
<html><head>    <title>Leobo theme</title>    <link rel="stylesheet" href="<?php bloginfo('stylesheet_url'); ?>"></head><body><div id="main_wrapper">    <div id="header">This is the header.</div>
index.php
 <?php get_header(); ?>
    <div id="content">Theme tutorial testing.</div>
<?php get_sidebar(); ?>
<?php get_footer(); ?>

<- add text in green, keep text in black

sidebar.php
    <div id="sidebar">Side Bar</div>
footer.php
    <div id="footer">Text is available under the Creative Commons Attribution-ShareAlike License; <br />additional terms may apply. By using this site, you agree to the Terms of Use and Privacy Policy. <br />
CopyRight &copy; wordpress and terrapin sky</div></div>   
</body>

</html>


Go to the your blog again and fresh, still look same


Finsh , let add some more complicated in next post:

Continue Reading
[Wordpress][Tutorial with image] Wordpress theme tutorial for beginners (3)

[Wordpress] Wordpress theme tutorial for beginners (1) - Create Basic Theme

The result of this tutorial will create a theme but can be enabled in admin panel.
Purpose is for beginners know the base concept about creating wordpress template only.
To create theme with inferface. Please read my next post.

And let start this chapter:
====================================================
Step 1) 
Go to your theme folder of your wordpress.
It’s in “\wp-content\themes”


Your_wordpress_root\wp-content\themes
change the red text to your installation root of your wordpress 

Step2) 
Create a folder with your template name, for my own example, I use "leodo" be my folder name


And then there are 3 files which necessary to be created, they are :
1.          index.php
2.          style.css
3.          screenshot.png

Step3) 
Create these file one by one.
And the screenshot.png can copy my pic below for your testing:


Step4) 
Add the line to your style.css and save it.
/*Theme Name: Leobo's Theme*/


Step5) 
Go to your admin page, Select “Themes”-> “installed themes” at left hand side
 
(if you are already that page, refresh the page)

 And then you will the new theme will appear there.


Also you can activate it. (Although you will see a blank page only..)

Finished !

* * * Extra * * *

Now you can get the theme with the preview image and the name.
but you want add some more information:


You can use these code at your style.css ,
and change the text in green to what you want:
/*
Theme Name: Leobo's Theme
Theme URI: http://www.terrapinssky.blogspot.com/theme/leobo
Author: Xenia Law
Author URI: http://www.terrapinssky.blogspot.com/
Description: This is the most base theme.
Version: 1.0.1
License: GNU General Public License v2 or later
License URI: http://www.gnu.org/licenses/gpl-2.0.html
Tags: blank, base
Text Domain: leobo
*/
And final you will get that:


Continue reading :
[Wordpress][Tutorial with image] Wordpress theme tutorial for beginners (2)

Thursday, February 28, 2013

[Wordpress] wordpress multisite setup tutorial with images

Allow Multisite

   
<--- This is a image with new wordpress.

1) Firstly look for your wp-config.php with your wordpress root directory. 
your_wordpress_root\wp-config.php 
 For my case
 C:\wamp\www\wpmu\wp-config.php

 
 2) Add the line in your wp-config.php:
define('WP_ALLOW_MULTISITE', true);


 3) Refresh your wordpress backend admin page index,
and than you will found there is a new item "Network Setup" appear in Tools panel

Installing a Network

4) Click the "Tool" -> "Network Setup"


5) fill in the blank and click install:


Enabling the Network

6) Copy the code I highlighed in blue in the figure.
Anybody has his/her own case:

7) add the code to your wp_config.php, above the line /* That's all, stop editing! Happy blogging. */ as shown below:


8) Open the file named .htassess in the root of your wordpress root.
The path:
your_wordpress_root\.htassess
 For my case, my path:
 C:\wamp\www\wpmu\.htassess

9) Opened that and add your own code highlighted in blue to your .htassess document :


10) Click link with "log in" shown below to login again.


11) And then if you can found "My Sites" is now the second item. There, all your sites are listed, Your wordpress multisite setup would be finished.