Showing posts with label Windows Platform. Show all posts

Wednesday, August 4, 2021

[windows][batch][Example] window batch run command

Step 1)
Create a file named with .bat file extension, such as "clean.bat"

Step 2)
:: if you want to write comment, use :: as line prefix

example:
::Delete folders
@ECHO OFF
rmdir /s /q "D:\data\diffList\out"
mkdir "D:\data\diffList\out"
del /s /q "D:\data\diffList\log\*.log"

Step 3)
Double click the file to run.

Reference:
https://stackoverflow.com/questions/16727941/how-do-i-execute-cmd-commands-through-a-batch-file

Thursday, September 28, 2017

[Chrome][Tutorial] Install Chrome Driver on windows platform

Step 1) Download driver

Visit Chrome Driver site and download required file.
https://sites.google.com/a/chromium.org/chromedriver/


Step 2) Move chromedriver.exe to Chrome installation directory


Find out chrome installation directory in your OS first:

Remarks :
For windows 8, there is some update, the path for installing chrome drive should be C:\Program Files (x86)\Google\Chrome\Application\CHROME_VERSION_NUMBER, such as C:\Program Files (x86)\Google\Chrome\Application\64.0.3282.186

Since I am using window 8, I need to check out my chrome version, my chrome version is 63.0.32239.132
So my path to add to environment variable is :
C:\Program Files (x86)\Google\Chrome\Application\63.0.3239.132

Step 4) Restart your command prompt


Reference:
https://productforums.google.com/forum/#!topic/chrome/vd3-DMq3orQ
https://sites.google.com/a/chromium.org/chromedriver/getting-started

Thursday, August 17, 2017

[Windows][Resolved] windows 8 search text in file content


Step 1

press alt button to show View menu

Step 2

click "Options" button

Step 3

Select "Change folder and search options"

Step 4 

Click the checkbox "Always search file names and contents (this might take several minutes)".

Step 5 

Click button "OK"

 Reference

https://superuser.com/questions/742710/how-search-file-content-in-windows-8-file-explorer

Wednesday, July 26, 2017

[php][windows] force using specific php version to run command

method 1 

Type this in command prompt:
set PATH=%PATH%;YOUR_PHP_DIRECTORY
for example:
set PATH=%PATH%;C:\xampp\php

method 2 

Using this command to specify the executable file to run the command prompt:
C:\xampp\php\php.exe -n -v
text in yellow is the php .exe you wanted to use for execute, and text in green is the command you want to execute. It's to check php version in this case/


Reference

https://stackoverflow.com/questions/15517718/php-version-on-windows-command-line
https://stackoverflow.com/questions/7767447/how-can-i-force-php-version-for-command-line

Monday, October 24, 2016

[Tutorial] Firebase Android project push notifications on window platform - part3

Previous article:

[Tutorial] Firebase Android project push notifications on window platform - part1
[Tutorial] Firebase Android project push notifications on window platform - part2

Step13

Select "Notifications" at your menu at firebase console, and then click the button "SEND YOUR FIRST MESSAGE".

Step14

Input textbox under "Message text" is the message you could show to users, in this example let click the arrow next to "Select app" to choose target users.

You should be able to choose your project package name as target:

Step15

 After the target selected, the "SEND MESSAGE" button is activate, let click that:
And then "SEND".

Step 16

Check your Android Emulator, you should be able to found out the message you set in firebase website


Wednesday, October 12, 2016

[Tutorial] Firebase Android project push notifications on window platform - part2

Previous article:

[Tutorial] Firebase Android project push notifications on window platform - part1

Step 8 

download your firebase google-services.json by clicking the button "google-services.json" and paste it to your android /app directory in your android project.


Step 9

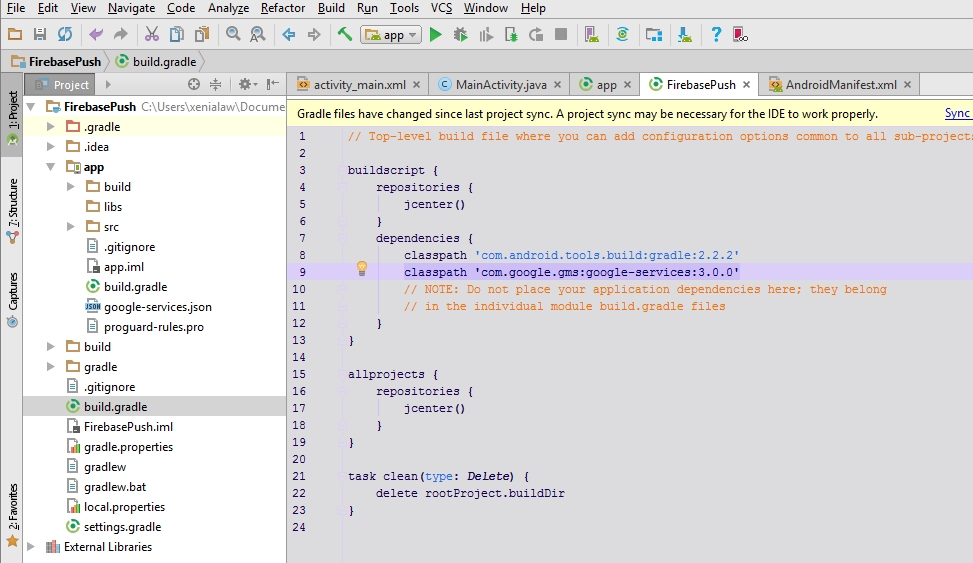
Add rules to your root-level build.gradle file, to include the google-services plugin:
    dependencies {
        classpath 'com.android.tools.build:gradle:2.2.2'
        classpath 'com.google.gms:google-services:3.0.0'
        // NOTE: Do not place your application dependencies here; they belong
        // in the individual module build.gradle files
    }

Step 10

And then add the apply plugin line at the bottom of the file to enable the Gradle plugin in your module Gradle file (usually the app/build.gradle):
dependencies {
    compile fileTree(dir: 'libs', include: ['*.jar'])
    androidTestCompile('com.android.support.test.espresso:espresso-core:2.2.2', {
        exclude group: 'com.android.support', module: 'support-annotations'
    })
    compile 'com.android.support:appcompat-v7:24.2.1'
    compile 'com.google.firebase:firebase-core:9.6.1'
    compile 'com.google.firebase:firebase-messaging:9.6.1'
    testCompile 'junit:junit:4.12'
}

Step11

click "Sync now" and wait for sync

Step12

Add a class FirebaseInstanceIDService to your project extends FirebaseMessagingService with the code show below to display notification from firebase.
package com.firebasetest.firebasepush;

import android.app.NotificationManager;
import android.app.PendingIntent;
import android.content.Intent;
import android.support.v4.app.NotificationCompat;
import android.util.Log;

import com.google.firebase.messaging.FirebaseMessagingService;
import com.google.firebase.messaging.RemoteMessage;

public class MyFirebaseMessagingService  extends FirebaseMessagingService {
    private static final String TAG = "FCM Service";

    @Override
    public void onMessageReceived(RemoteMessage remoteMessage) {
        // TODO: Handle FCM messages here.
        // If the application is in the foreground handle both data and notification messages here.
        // Also if you intend on generating your own notifications as a result of a received FCM
        // message, here is where that should be initiated.
        //super.onMessageReceived(showNotification(remoteMessage.getData().get("message")));
        Log.d(TAG, "From: " + remoteMessage.getFrom());
        Log.d(TAG, "Notification Message Body: " + remoteMessage.getNotification().getBody());
        showNotification(remoteMessage.getNotification().getBody());
    }

    private void showNotification(String message) {
        Intent i = new Intent(this,MainActivity.class);
        i.addFlags(Intent.FLAG_ACTIVITY_CLEAR_TOP);

        PendingIntent pendingIntent = PendingIntent.getActivity(this,0,i,PendingIntent.FLAG_UPDATE_CURRENT);

        NotificationCompat.Builder builder = new NotificationCompat.Builder(this)
                .setAutoCancel(true)
                .setContentTitle("FCM Test")
                .setContentText(message)
                .setSmallIcon(R.drawable.ic_launcher)
                .setContentIntent(pendingIntent);

        NotificationManager manager = (NotificationManager) getSystemService(NOTIFICATION_SERVICE);

        manager.notify(0,builder.build());
    }
}

Step 12

Add MyFirebaseMessagingService.java as a service in your AndroidManidest.xml file.
        <service android:name=".MyFirebaseMessagingService">
            <intent-filter>
                <action android:name="com.google.firebase.MESSAGING_EVENT"/>
            </intent-filter>
        </service>

Continue :

[Tutorial] Firebase Android project push notifications on window platform - part3

Monday, October 3, 2016

[Tutorial] Firebase Android project push notifications on window platform - part1

Step 1) 

Open a new Android project named "FirebasePush":


Step2

Go to your firebase console (https://console.firebase.google.com/) and click "CREATE NEW PROJECT" button to create a new firebase project.

Step 3 

Enter your project name, here i used the project name same as my Android project development: "FirebasePush", and then click "CREATE PROJECT".

 Step 4

Select "Click add firebase to your Android app".

 Step 5

Copy your android project package name from your AndroidManifest.xml to your firebase package name text input box. For my case it's "com.firebasetest.firebasepush".

Step 6

use command prompt and change the working directory as somewhere where your keytool located, it should be located in your bin folder in your java jdk installation directory.
[Android][Resolved] Where is Android keytool in windows platform?

and then use the command with default password "android" to get your Debug signing certificate SHA-1 key.
keytool -exportcert -list -v -alias androiddebugkey -keystore %USERPROFILE%\.android\debug.keystore
Copy your  SHA-1 key to your firebase Debug signing certificate SHA-1 (optional) input box.
Then click "ADD APP".

Step 7

you can also add your SHA256 certificate fingerprints resulted in your command prompt when you get the SHA-1 key. you need to next the button next to firebase project package name, and then select "Manage".


click "ADD FINGERPRINT" and then paste your SHA256 certificate fingerprints in input box:


Continue:

[Tutorial] Firebase Android project push notifications on window platform - part1
[Tutorial] Firebase Android project push notifications on window platform - part2
[Tutorial] Firebase Android project push notifications on window platform - part3

Friday, January 15, 2016

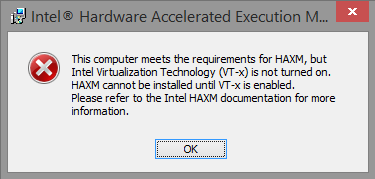
[Windows][Resolved] This computer meets requirements for HAXM, but VT-x is not turned on.


This problem was found during the installation of Intel x86 Emulator Accelerator ,there is the full error message:


Step 1

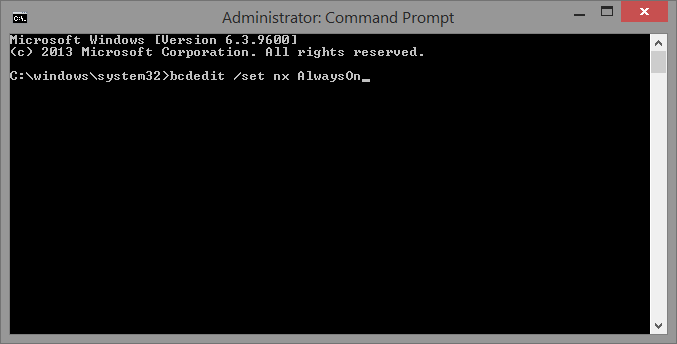
Thing to do is run command prompt as administrator:

Step 2

Run command :
bcdedit /set nx AlwaysOn.


Step 3

Run the your installation of again and it may works. If it's still not working you need go to BIOS mode to fix it.

Step4 (if necessary)

Set "Intel(R) Virtualization Technology" from Disabled to Enabled. (Different MotherBoard with different name and settings. some BIOS's options is  "Enable hardware -asisted Virtualization")

Step5

Run installation of Intel x86 Emulator Accelerator again.

Reference:

https://software.intel.com/en-us/blogs/2014/03/14/troubleshooting-intel-haxm
http://stackoverflow.com/questions/21635504/error-during-installing-haxm-vt-x-not-working